Discover common problems when adjusting a LiftMaster garage door opener, including sensor misalignment, travel limits, remote malfunctions, and troubleshooting tips.
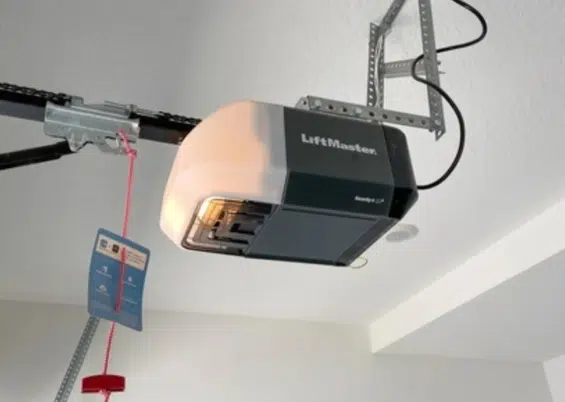
LiftMaster is a respected garage door opener industry name known for its reliable, long-lasting systems. However, like any mechanical device, your opener may occasionally require adjustments. These adjustments are essential to maintain safety, ensure smooth operation, and prevent excessive wear on the motor or the door components.
If you’re experiencing performance issues, adjusting a LiftMaster garage door opener might be the first solution to consider. Whether it’s uneven movement, reversing unexpectedly, or noisy operation, these problems often stem from settings that need fine-tuning.

In this blog, we’ll explain the most common problems with LiftMaster garage door openers, why they happen, and how to fix them. Knowing what to look for can save you time and help avoid expensive repairs.
Signs You May Need to Adjust Your LiftMaster Garage Door Opener
Your LiftMaster garage door opener is designed to operate smoothly and reliably. However, settings can shift over time or components can wear, leading to noticeable performance issues. Before making manual adjustments, it’s important to confirm whether the opener is truly out of sync. Here are key warning signs that suggest an adjustment may be needed:
The Door Reverses Before Hitting the Floor
If the door starts to close but suddenly reverses direction before touching the ground, this often indicates that the down-travel limit or down force setting needs adjustment. The system may mistakenly detect an obstruction or excess resistance.
The Door Doesn’t Fully Close or Open
When the door stops short of its full open or closed position, it’s a sign that the travel limits are incorrectly set. This can affect security and convenience, especially if the door remains partially open.
Intermittent or Jerky Movement During Operation
Jerky or inconsistent movement may signal issues with the drive system, track alignment, or force settings. These irregularities could also stem from a worn gear or tension imbalance that needs correction.
Unusual Grinding or Humming Sounds from the Opener
Odd noises such as grinding, humming, or excessive vibration often point to mechanical stress. This could mean the opener is applying too much force or struggling against misaligned components.
Delayed Response After Pressing the Remote
If there’s a noticeable delay between pressing the remote or wall control and the door’s movement, it could be due to weak signal reception, worn wiring, or a misconfigured opener setting that needs adjustment.
Common Issues You Might Encounter
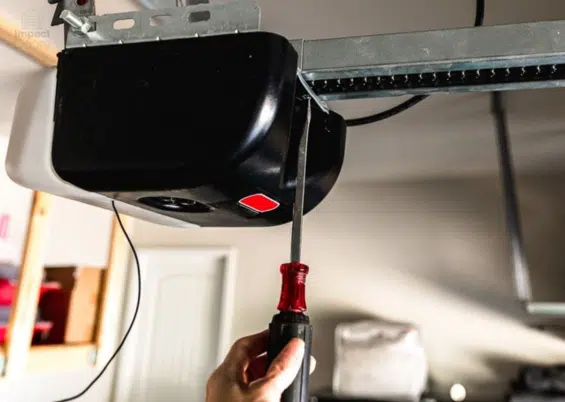
Limit Switch Misalignment
The limit switches control how far your garage door travels when opening or closing. If these are set incorrectly, your door may stop short or reverse prematurely. Adjusting the limit settings with the correct screwdriver on the motor unit usually resolves this.
Force Setting Errors
Force settings determine how much resistance your opener will tolerate before stopping or reversing. The opener may behave erratically if these settings are too low or too high. Adjusting a LiftMaster garage door opener with proper force calibration ensures smoother and safer operation.
Sensor Obstruction or Misalignment
Photo-eye sensors are critical safety features. If they’re misaligned or obstructed by debris, your door might not close or reverse unexpectedly. Realigning the sensors and cleaning the lens can often restore normal functionality.
Chain or Belt Tension Problems
LiftMaster openers use either a chain or belt drive. If the tension is too tight or too loose, it can cause jerky movements or strange noises. Checking the manufacturer’s recommended tension and making fine adjustments helps reduce strain on the motor and extend the lifespan of your opener.
Remote Signal Interference
Sometimes the problem isn’t mechanical. Interference from nearby electronics or outdated remote batteries can cause delayed or failed responses. Resetting the remote or upgrading to a newer frequency-compatible model can resolve signal-related problems.
Tips for Safely Adjusting a LiftMaster Garage Door Opener
Adjusting your LiftMaster garage door opener can improve performance and fix common issues, but doing it safely is essential. Because these systems involve mechanical components and electrical wiring, following basic safety precautions helps prevent injury or equipment damage. Below are key safety tips to keep in mind:
Disconnect Power Before Making Adjustments
Always unplug the opener or shut off the power at the breaker box before making any manual changes. This helps prevent accidental activation and protects you from electrical hazards while working on the unit.
Use a Sturdy Ladder for Safe Access
When reaching the opener motor or control panel, use a stable, well-positioned ladder on a flat surface. To reduce the risk of falls, avoid standing on unstable objects or overreaching.
Refer to the Owner’s Manual
LiftMaster models can vary in design and layout. Consult your specific model’s manual to identify:
- The location of travel and force adjustment screws
- Recommended tools
- Any model-specific safety features or warnings
Test After Each Adjustment
After making a slight change to the travel limits or force settings:
- Reconnect power
- Operate the door to test the effect
- Make further adjustments gradually, as needed
This step-by-step testing approach ensures you’re not introducing new issues and that the door moves smoothly and safely.
Avoid Over-Correcting Settings
Making large adjustments at once can throw the system further out of balance. Be patient and precise—small turns on adjustment screws can make a big difference in door behavior.
When to Call a Professional
Adjusting a LiftMaster garage door opener can often be done with a few simple tools and precautions, but sometimes a technician is the best choice. If the door is unbalanced, the motor continues to strain, or the problem recurs despite adjustment, it may be a deeper mechanical or electrical issue.
A certified technician can also inspect the entire garage door system for other signs of wear or misalignment that could impact safety or performance. This approach ensures you’re not overlooking issues that could become more severe or dangerous.
Preventive Maintenance to Avoid Frequent Adjustments
Maintaining your LiftMaster system can help you avoid frequent manual changes. Consider the following practices:
- Regularly lubricate moving parts
- Check the door balance semi-annually
- Clean and test the safety sensors monthly
- Replace worn-out remote batteries
- Schedule an annual professional inspection
Routine maintenance ensures your LiftMaster opener performs reliably, extending its lifespan and protecting your home investment.
Frequently Asked Questions
How do you reset a LiftMaster garage door opener?
To reset a LiftMaster garage door opener, press and hold the “Learn” button on the motor unit until the LED light turns off, which clears all remote and keypad codes. Then, reprogram your remotes and keypad as needed to restore functionality.
How do I adjust my LiftMaster garage door opener?
You can adjust your LiftMaster opener by accessing the adjustment screws or buttons on the opener unit. These let you change travel limits, force, and the sensitivity for opening and closing the door safely and smoothly.
How to adjust the force on a garage door opener with manual adjustment screws?
Locate the force adjustment screws on the opener—one for opening and one for closing. Turn the screws clockwise to increase force or counterclockwise to decrease it, adjusting incrementally while testing the door’s operation after each change.
How do I program my LiftMaster garage opener?
Press the “Learn” button on the opener until the LED lights up, then press the button on your remote control within 30 seconds. The LED blinks or turns off, indicating the remote is successfully programmed.
How to program a LiftMaster garage door opener without the learn button?
If your model lacks a visible Learn button, it may be inside a panel on the opener—remove the cover to access it. If it’s truly missing, consult the opener’s manual for alternate programming steps, which may involve specific remote models or wall console features.
Conclusion
Adjusting a LiftMaster garage door opener doesn’t have to be complicated, but it does require attention to detail. From misaligned sensors to incorrect force or limit settings, these issues can usually be resolved with basic tools and some patience. However, knowing when to call a professional can save time and ensure safety.
Being proactive about maintenance and understanding your opener’s signs of stress helps keep your garage system functioning properly for years. With the proper knowledge and support, adjusting a LiftMaster garage door opener becomes part of smart homeownership.
If you’re unsure or simply want peace of mind, reach out to Premium Garage Door Repair in Chicago, IL. Our expert team is here to help with inspections, repairs, and complete garage door solutions tailored to your home.
End Note
Premium Garage Door Repair is your go-to source for LiftMaster garage door openers in the Chicago Metro Area. With a deep understanding of the region’s unique climate and architectural needs, we provide solutions combining innovation and durability. Whether you’re exploring garage door installation in Chicago, IL, or upgrading to smart garage door openers, our team delivers professional results tailored to your home or business.
As a trusted company, we offer a full range of garage door services, including garage door repair in Chicago and New Lenox, as well as expert garage door opener repair. No matter your location within our expansive service area, we’re ready to help you confidently modernize your garage system. For more inspiration and information, browse our photo gallery and stay updated through our blog. When you’re ready to enhance your home’s security and convenience, contact us to speak with our knowledgeable team.
Premium Garage Door Repair
12634 West 159th St. Homer Glen, IL. 60491
+18447077074